
To really get your kitchen countertops germ-free, you can't just stop at cleaning. You have to clean first to get rid of crumbs and grime, then follow up with the right disinfectant. Let it sit for the recommended time, then wipe it clean.
It’s a simple but vital distinction: cleaning removes germs, while disinfecting kills them. Getting this right is the secret to a truly hygienic kitchen.
Why Wiping Down Your Counters Is Not Enough
That quick swipe with a damp cloth after dinner? It makes your kitchen look clean, but it leaves behind an invisible world of nasty pathogens. It's a common mistake to use "cleaning" and "disinfecting" as if they mean the same thing, but they're two totally different jobs.
- Cleaning is about using soap and water to physically lift away dirt, food bits, and some germs. Think of it as the essential first step.
- Disinfecting is the knockout punch. It uses chemicals to kill the bacteria and viruses that cleaning leaves behind. If you skip this, you’re often just pushing germs from one spot to another.
The Germs Hiding in Plain Sight
Your kitchen counter is prime real estate for germs. It’s constantly in contact with raw meat, unwashed veggies, and whatever is on your hands or that sponge you’ve been using for a week. Nasty culprits like E. coli, Salmonella, and norovirus can set up shop on these surfaces, creating a real health risk for your family.
You might be surprised to learn that how often you clean isn't nearly as important as how you clean. A survey on kitchen habits found that while 72% of people cleaned their countertops daily, they still had significant microbial contamination. The study showed no real link between cleaning frequency and lower bacteria counts, proving that your method and product choice are what truly matter. You can get into the nitty-gritty of the findings on effective disinfection techniques.
This infographic really drives the point home, showing the difference between a simple wipe-down and a proper disinfection.
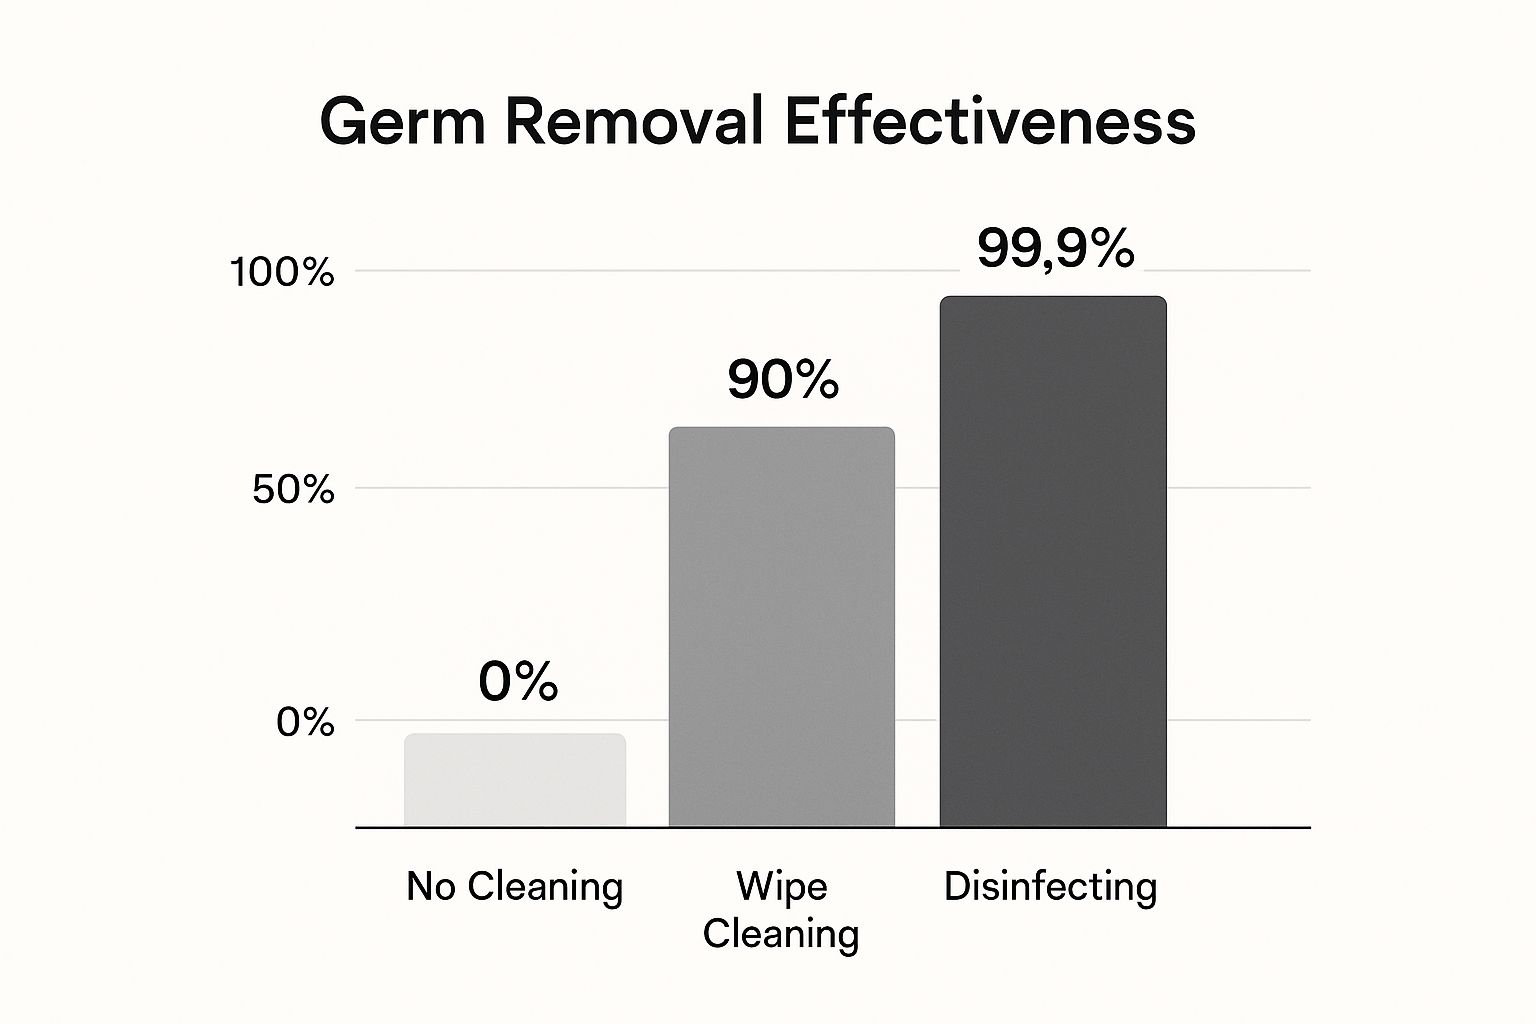
As you can see, disinfecting hits a 99.9% germ removal rate. That's a massive improvement over the 90% you get from just wiping.
Choosing the Right Disinfectant Matters
Grabbing the wrong product can be just as bad as not disinfecting at all. Worse, it could ruin your expensive countertops. Harsh chemicals like bleach or ammonia can permanently etch natural stone, and acidic solutions like vinegar will dull the beautiful finish on materials like marble.
Choosing the right disinfectant for your countertop is crucial. What works wonders on laminate could be a disaster for granite. To help you avoid costly mistakes, here's a quick-glance table to match the right product with your surface.
Disinfectant Suitability by Countertop Type
| Countertop Material | Safe Disinfectants | Disinfectants to Avoid |
|---|---|---|
| Granite (Sealed) | pH-neutral cleaners, Isopropyl alcohol (70%) | Bleach, Ammonia, Vinegar, Citrus-based cleaners |
| Marble & Travertine | pH-neutral cleaners, Warm water & mild soap | Anything acidic (Vinegar, Lemon), Bleach, Abrasives |
| Quartz | Mild soap & water, Isopropyl alcohol (70%) | Harsh chemicals, Bleach, Abrasive scrubs |
| Laminate | Diluted bleach solution, All-purpose cleaners | Abrasive powders, Scouring pads, Undiluted bleach |
| Butcher Block | Diluted white vinegar, Mild dish soap & water | Harsh chemicals, Excessive water, Bleach |
| Stainless Steel | Isopropyl alcohol (70%), Diluted vinegar, Mild soap | Bleach, Chlorine-based cleaners, Abrasive pads |
Always spot-test a new cleaner in a hidden area first, just to be safe. Remember, keeping your kitchen both clean and beautiful is all about using the right tools for the job.
The goal is simple: kill the pathogens without harming your countertop. You have to match the disinfectant to your specific material. Knowing what to use—and what to absolutely avoid—is the first and most important rule of proper kitchen hygiene.
Setting the Stage for a Deeper Clean

Trying to disinfect a dirty surface is like trying to mop a floor covered in leaves—it just doesn't work. Disinfectants are designed to kill germs, but they need direct contact to do their job. A layer of crumbs, grease, or sticky juice acts as a shield, protecting pathogens from the very solution meant to wipe them out.
This initial cleaning phase is the most overlooked yet critical part of disinfecting your kitchen countertops properly. Without it, you're mostly just smearing germs around in a chemical soup.
Clearing the Decks for Action
Before you even think about grabbing a disinfectant, you need a clean slate. Seriously, take a moment and remove everything from your counters. That means the toaster, the knife block, the fruit bowl, and that stack of mail that always seems to find its way there.
Wiping around objects leaves "shadows" where germs can thrive undisturbed. By completely clearing the surface, you ensure every single square inch is ready for a thorough pre-clean. This step alone dramatically boosts how well your disinfectant works.
"You want a completely fresh canvas, with not a thing on it. You are starting a new season, with new foods and fresh herbs, with new hopes and new tasks."
The Pre-Cleaning Process
Once your counters are clear, it's time to tackle the grime. You don't need harsh chemicals for this step; simple tools are often the most effective.
- Gather Your Supplies: Grab a spray bottle with warm water and a few drops of mild dish soap, plus a clean microfiber cloth. Microfiber is brilliant at trapping tiny particles instead of just pushing them around.
- Work in Sections: To avoid streaks and make sure you don't miss any spots, divide your countertop into smaller, manageable sections. Spray one area at a time with the soapy water.
- Wipe with Purpose: Using your microfiber cloth, wipe the section in a gentle "S" pattern. This technique helps you collect debris without redepositing dirt onto already clean areas. For stubborn, stuck-on food, let the soap solution sit for a minute to loosen it up before wiping.
- Rinse and Dry: After washing a section, use a separate, clean cloth dampened with plain water to rinse away any soap residue. Immediately follow up by drying the area completely with a dry cloth. This is especially crucial for materials like butcher block, as standing water can cause damage.
This foundational cleaning is a non-negotiable first step. If you're looking for a more comprehensive approach, our kitchen deep clean checklist offers a detailed guide to refreshing your entire space. With a truly clean surface, your disinfectant can finally get to work.
Disinfecting Granite and Marble Without Damage

Natural stone countertops like granite and marble are often the stunning centerpiece of a kitchen, but that beauty comes with a catch. These materials are porous and surprisingly sensitive to chemicals. Grab the wrong bottle from under the sink, and you could be looking at etching, dull spots, or a ruined sealant.
Many of the cleaners we use every day are the sworn enemy of natural stone. Knowing what not to use is just as important as knowing what works. Disinfecting these surfaces is all about a gentle touch—you need to kill the germs without compromising the stone itself.
Chemicals That Will Ruin Your Stone
Before you even think about using that all-purpose cleaner, pause. The wrong formula can cause irreversible damage to granite and marble in just a few seconds. Anything acidic or highly alkaline is completely off-limits.
Here are the main offenders to keep far, far away from your countertops:
- Vinegar and Lemon Juice: The acid in these common DIY cleaners will literally eat away at the calcium carbonate in marble. On granite, it can weaken the sealant, leaving behind dull spots called etches.
- Bleach and Ammonia: These high-alkaline chemicals are far too aggressive for stone. They’ll break down the protective sealant, exposing the porous stone underneath to stains and bacteria.
- Abrasive Cleaners: Forget about scouring powders or gritty creams. They will physically scratch and dull the polished surface of your beautiful countertops.
Understanding which ingredients to steer clear of is half the battle. To dive deeper, take a look at our guide on how to choose cleaning products that are safe and effective for your entire home.
The Safest Way to Disinfect Natural Stone
So, what's the secret weapon for safely disinfecting your granite or marble? A simple, pH-neutral solution that’s tough on germs but gentle on your stone. Your best bet is good old isopropyl alcohol.
For a reliable disinfectant, just mix a 50/50 solution of 70% isopropyl alcohol and water in a spray bottle. This concentration is proven to kill bacteria and viruses without being harsh enough to harm the sealant on your stone.
Pro Tip: One of the best things about isopropyl alcohol is how quickly it evaporates. It disinfects on contact and leaves behind a streak-free shine with zero residue—perfect for keeping polished stone looking its best.
Your Step-by-Step Disinfection Process
After you've pre-cleaned your countertop to get rid of crumbs and spills, you're ready to disinfect.
- Spray the Solution: Lightly mist a section of the counter with your 50/50 alcohol and water mix. You don't need to soak it; a light, even coat is all it takes.
- Let It Dwell: This is the most important part. Let the solution sit on the surface for 3-5 minutes. This "contact time" is what allows the alcohol to actually kill the pathogens.
- Wipe It Clean: Grab a clean, dry microfiber cloth and wipe the surface down. We like to use an "S" pattern to make sure we aren't just pushing germs around.
- Admire the Shine: That's it! You're left with a beautifully disinfected and streak-free countertop.
This straightforward method gives you total peace of mind, ensuring your high-end stone surfaces are both hygienic and protected from damage. It’s the go-to approach for pros who need to maintain the elegance of granite and marble.
A Guide to Disinfecting Quartz and Laminate

Engineered materials like quartz and laminate are the workhorses of the modern kitchen. They're built to handle daily life far better than many natural stones, but that toughness doesn't make them indestructible. Using the wrong cleaners can still cause discoloration, peel back the layers, or leave them looking dull and lifeless.
Unlike porous granite, quartz doesn't let bacteria hide deep within the material itself. Laminate also has a sealed surface, but its weak spots are the seams and edges where moisture can sneak in. For these surfaces, disinfecting is all about picking solutions that kill germs without compromising their unique structures.
Safely Disinfecting Quartz Countertops
Quartz is incredibly tough, but it has an Achilles' heel: harsh, high-pH chemicals and anything abrasive. The resins holding the crushed quartz together can get damaged by aggressive cleaners, which is what causes that hazy, dull look over time. Even though it resists stains like a champ, you still need to put away the abrasive scrubbers.
For routine disinfecting after you've wiped away crumbs and spills, you have a few great choices:
- Commercial Disinfecting Wipes: They're fast, effective, and specifically made to be safe on non-porous surfaces like quartz.
- 70% Isopropyl Alcohol Solution: A simple 50/50 mix of 70% isopropyl alcohol and water in a spray bottle is my go-to. It kills germs on contact and evaporates quickly for a streak-free shine.
- Carefully Diluted Bleach: For a serious deep clean, mix one tablespoon of bleach into a full gallon of water. Never, ever pour straight bleach onto your countertops.
Homeowners are catching on to the need for specialized products. The global market for countertop cleaners is projected to leap from $5 billion in 2025 to almost $8 billion by 2033. It’s clear people are investing more in protecting their surfaces. You can discover more insights about this trend and its impact on the cleaning industry.
Best Practices for Laminate Surfaces
Water is the ultimate enemy of laminate. The top layer is water-resistant, but any liquid that seeps into seams or exposed edges can make the particleboard core swell and warp. The trick is to use a disinfectant that works fast without soaking the surface.
A diluted bleach solution (one tablespoon per gallon of water) works wonders here, too. Just spritz it on, let it sit for the proper time, and then wipe it all away. You're aiming for a damp surface, not a drenched one. Always dry the countertop completely afterward, giving extra attention to the seams and the area around the sink.
The most critical factor in how to disinfect kitchen countertops effectively is contact time. This is the amount of time a disinfectant must remain visibly wet on a surface to kill the specified pathogens. Simply spraying and immediately wiping does almost nothing.
The Importance of Contact Time
Every single disinfectant, whether it's a store-bought spray or a homemade mix, has a required contact time—sometimes called "dwell time." This can be anywhere from 30 seconds to 10 minutes.
To make sure you're actually eliminating germs:
- Read the Label: The product instructions will always tell you the specific contact time.
- Keep It Wet: If the disinfectant starts to dry before time is up, give it another light spritz.
- Wipe and Rinse: Once the time has passed, use a clean, damp cloth to wipe away any residue, then dry the surface completely.
Ignoring contact time is the single biggest mistake people make. Following this one rule is the key to a truly hygienic kitchen, protecting your family as well as your countertops.
Keeping Your Kitchen Hygienic Every Day
A truly clean kitchen comes down to daily habits, not just the occasional deep clean. While knowing how to disinfect your countertops is a huge part of the battle, preventing germs from building up in the first place makes everything easier and your home much safer. It’s about being proactive instead of reactive.
Think about it this way: if you've just handled raw chicken, don't leave that mess for later. Clean and disinfect any surface the package or meat touched right away. That one simple move stops cross-contamination before it can even start.
Focus on High-Touch Danger Zones
Let's be real, not all parts of your countertop see the same amount of action. Some spots are magnets for germs and need attention more often. If you can get into a quick wipe-down routine for these "danger zones" every day, you'll slash the number of microbes in your kitchen.
Here are the high-priority areas you should hit daily:
- The area around the sink: It’s almost always damp, making it the perfect breeding ground for bacteria from rinsed vegetables or dirty dishes.
- Your main food prep space: This is ground zero for chopping, mixing, and potential foodborne pathogens.
- Spots where you drop grocery bags: Those bags have been on checkout belts and in your car trunk—you don't want what they've picked up on your food surfaces.
Giving these key areas a quick disinfection each evening is a small habit that pays off big time for your family's health. For a broader look at keeping your entire home safe, the advice in How to Disinfect Surfaces for a Safer Home is a great resource.
A truly disinfected kitchen isn't the result of one heroic cleaning session. It's the cumulative effect of small, consistent actions performed daily. This is the secret to keeping your family safe from harmful germs.
Don't Spread Germs with Dirty Tools
One of the biggest cleaning mistakes I see is people trying to clean with a dirty tool. A contaminated sponge or dishcloth doesn't actually clean—it just smears millions of bacteria around, turning one messy spot into a kitchen-wide problem.
Your cleaning tools are just as crucial as your disinfectant spray. Without the right gear, all your hard work is for nothing. We've put together a full guide on the basic cleaning supplies every home should have, so you know you’re always ready for a real clean.
Think of your kitchen sponge as a potential germ factory. To break that cycle of contamination, you need to get a few habits down:
- Sanitize Sponges Daily: After you're done cleaning, rinse the sponge well, squeeze out all the water, and pop it in the microwave (while it's still damp) for one minute. This will kill off most of the nasty bacteria.
- Replace Sponges Weekly: Sponges don't last forever. They break down and get harder to clean. Make it a rule to toss the old one and grab a fresh one every single week. No exceptions.
- Wash Cloths in Hot Water: If you're a fan of reusable dishcloths, throw them in the washing machine on the hot cycle at least every other day to kill any pathogens that are hanging around.
Your Top Countertop Disinfection Questions, Answered
Even when you know the steps and have the right products, a few questions always seem to surface when it comes to keeping kitchen countertops truly clean. I've gathered the most common ones I hear to clear up any confusion and help you feel totally confident in your routine.
Getting this right isn't just about sparkling surfaces—it's about keeping your family safe. Doing too much can be just as risky as not doing enough. The goal is to land on a smart, effective routine that works for your home.
Can I Make My Own Disinfectant?
Absolutely. You can whip up a powerful disinfectant with ingredients you likely already have. A simple diluted bleach solution or 70% isopropyl alcohol is incredibly effective on non-porous surfaces like laminate and quartz. If you have natural stone, stick with the alcohol solution to avoid any risk of etching or damage.
But a word of caution: homemade solutions demand respect. You have to get the dilution ratios right, and never mix different chemicals. A classic and dangerous mistake is mixing bleach and ammonia, which creates toxic gas.
No matter what you're using—store-bought or homemade—proper ventilation is non-negotiable. Always crack open a window or flip on a fan to get the air moving and keep fumes from building up.
This became a huge issue during the pandemic. In fact, U.S. poison control centers saw a 20.4% jump in calls about cleaner and disinfectant exposures from January to March 2020 compared to the year before. That statistic from the CDC is a stark reminder to always follow directions carefully, especially when kids are around.
How Often Should I Disinfect My Countertops?
The honest answer? It completely depends on how you use your kitchen. A daily wipe-down with soap and water is perfect for general cleaning, but you only need to break out the heavy-duty disinfectant for specific situations.
You should always disinfect your countertops in these cases:
- After prepping raw meat, poultry, or fish. This is a must-do to stop pathogens like Salmonella and E. coli in their tracks.
- When someone in the house is sick. Hitting high-touch surfaces like countertops can seriously cut down on the spread of germs.
- After they've touched something questionable. Think grocery bags that were on the store floor or a dirty backpack. A quick disinfection is a smart move.
For most homes, this kind of targeted approach makes more sense than a daily deep disinfection. As a general rule of thumb, a full disinfection of all your countertops once a week is a great baseline for keeping your kitchen hygienic.
What Is the Difference Between Sanitizing and Disinfecting?
People throw these terms around interchangeably all the time, but they actually mean two different things according to public health standards. Knowing the difference helps you pick the right tool for the job.
- Sanitizing lowers the number of bacteria on a surface to a safe level. It’s designed to kill 99.9% of specific bacteria, usually within 30 seconds.
- Disinfecting is the next level up. It destroys or inactivates both bacteria and viruses on a surface. This process is more thorough and often needs more time on the surface to kill 99.999% of germs.
Here's an easy way to think about it: you sanitize your hands, but you disinfect a countertop that just had raw chicken on it. When kitchen hygiene is the goal, disinfecting is what you need for those high-risk moments.
At Custom Maids, we believe a clean home is a safe home. If you're looking for a professional touch to ensure your kitchen is spotless and hygienic, we're here to help. Discover our customized cleaning services at https://custom-maids.co and let us make your home shine.