
Getting rid of those stubborn bathtub stains is all about matching the right cleaner to the type of mess you're dealing with. It's not about scrubbing harder; it's about cleaning smarter.
For instance, a simple paste of baking soda and vinegar works wonders on soap scum and hard water spots, but rust stains? They need a completely different game plan. The key is figuring out what you're up against first.
Your Quick Guide to a Spotless Bathtub
We’ve all been there—staring at a frustrating stain in the bathtub that just won’t budge. Before you grab the harshest chemical cleaner under the sink, take a breath. Not all stains are created equal.
Most bathtub discoloration falls into a few common categories, and each one has a weakness. Knowing the enemy is half the battle.
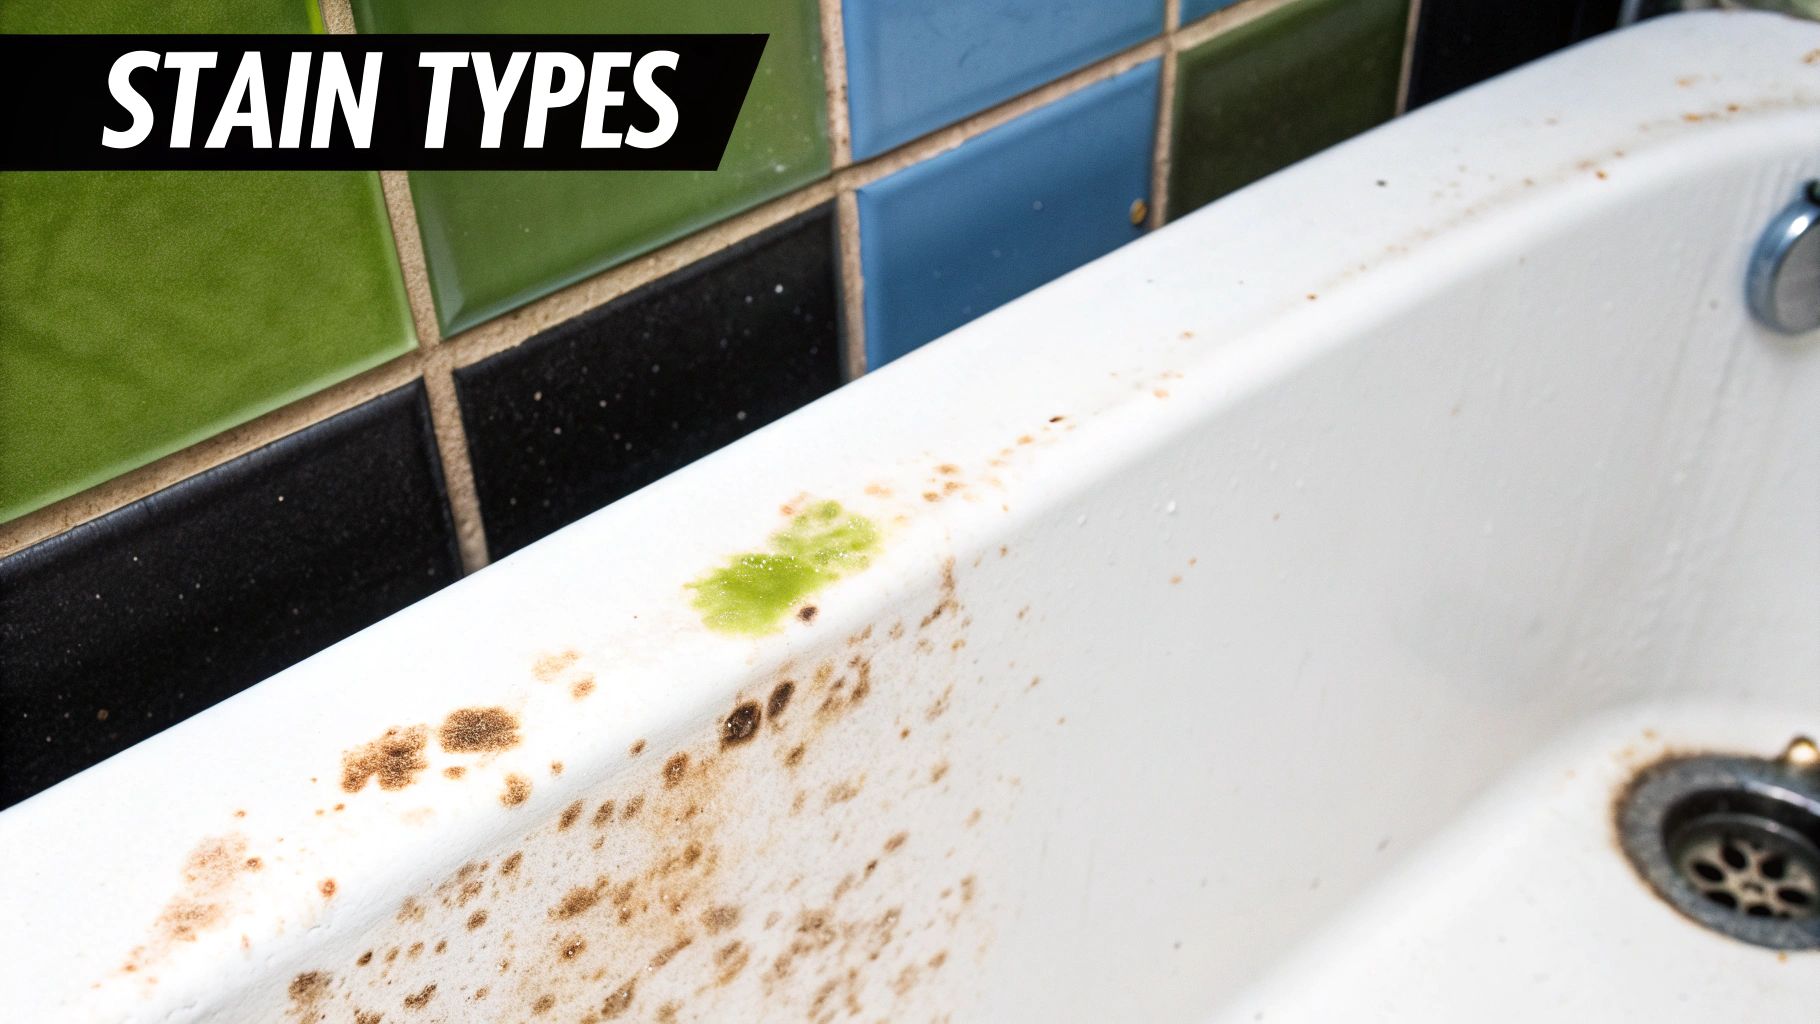
Is it a chalky, white film that feels gritty? That's almost certainly soap scum mixed with hard water minerals. Seeing reddish-brown streaks under the faucet? That’s a telltale sign of rust, either from iron in your water or a slow drip. Once you identify the culprit, you can choose a cleaning method that’s effective without being overly abrasive.
This guide will walk you through a clear plan for tackling any blemish your tub throws at you. We'll cover everything from simple, powerful homemade solutions to targeted commercial products for those extra-tough spots. Starting with the right strategy saves you time, effort, and protects your tub's finish from unnecessary damage.
Key Takeaway: The secret to a spotless tub isn't brute force. It's using the correct cleaning agent for the specific stain you have. A mismatched approach can be a waste of time or, even worse, damage your bathtub's surface.
Quick Stain Identification and Solution Guide
To get you started on the right foot, I've put together a quick reference table. Think of it as your cheat sheet for identifying common bathtub stains and knowing exactly which solution to try first. This simple step sets you up for cleaning success from the get-go.
| Stain Type | Appearance | Recommended First Action |
|---|---|---|
| Soap Scum | Chalky, white, or grayish film | Baking soda and vinegar paste |
| Hard Water | Dull, hazy, or spotty residue | White vinegar soak or spray |
| Rust | Reddish-brown or orange streaks | Lemon juice and salt scrub |
| Mildew | Black or pinkish spots in corners | Hydrogen peroxide or vinegar spray |
With this table, you can quickly diagnose the problem and move straight to the most effective, gentle solution. It's the first step toward making that tub sparkle again.
What Kind of Stain Am I Dealing With?
Not all bathtub stains are created equal. Knowing what you're up against is the first step to winning the cleaning battle, because using the wrong approach can be a waste of time or even damage your tub's surface.
By just looking at the color, texture, and location of the stain, you can figure out the problem and pick the best solution. This stops the aimless scrubbing and helps you clean smarter, not harder.
Identifying Hard Water Stains and Soap Scum
If you see a chalky, white film or a dull, grayish residue clouding up your tub's surface, you're almost certainly dealing with soap scum or hard water stains.
Soap scum is a lovely combination of soap residue, body oils, and minerals from your water. It usually feels a bit greasy or waxy and loves to build up in areas where water pools.
Hard water stains, on the other hand, are mineral deposits—mostly calcium and magnesium—left behind after water evaporates. These can look like faint white spots or a stubborn, cloudy film that makes your tub look perpetually dirty. The two often go hand-in-hand, creating a tough layer of grime.
Expert Tip: Don't confuse soap scum with your tub's actual finish. A quick test is to scrape a small, hidden spot with your fingernail. If a chalky or waxy substance comes off, you’ve confirmed it’s buildup that can be cleaned away.
For a deeper dive into tackling these mineral deposits, check out our complete guide on cleaning hard water stains.
Recognizing Rust and Mildew
See any reddish-brown or orange streaks, especially near the drain or under a faucet? That's a classic sign of rust. Rust stains are usually caused by one of two things: high iron content in your water supply or a slow, persistent drip from a leaky fixture. The constant exposure to water and air causes iron particles to oxidize, leaving behind that unmistakable color.
Another common culprit, particularly in damp corners or along grout lines, is mildew. Mildew shows up as black, green, or even pinkish spots and thrives in the humid environment of a bathroom.
Unlike other stains, mildew is a living fungus. That means you need a cleaning solution that not only removes the discoloration but also kills the spores to stop it from coming back. Getting these specific stains identified correctly is the key to getting rid of them for good.
Homemade Cleaners That Actually Work
You don’t always have to reach for harsh chemicals to get your bathtub sparkling again. In fact, some of the best stain fighters are probably sitting in your kitchen right now, offering a cheap, quick, and natural way to tackle grime.
This isn’t just a budget-friendly trick; it's part of a huge shift toward sustainable cleaning. The natural household cleaner market was valued at USD 6.97 billion and is expected to climb to USD 13.28 billion by 2030. People are realizing that simple ingredients like the organic acids in these recipes get the job done right.
The Classic Baking Soda and Vinegar Paste
There’s a reason this duo is legendary in the cleaning world. Baking soda (sodium bicarbonate) is a gentle abrasive, meaning it can physically scrub away gunk without scratching up sensitive surfaces like acrylic or porcelain.
Vinegar, on the other hand, is a weak acid that works chemically to dissolve the mineral deposits that create soap scum and hard water stains. When you mix them, that fizzy reaction you see is actually helping to lift the dirt right off the surface.
Here's how to whip up this powerful paste:
- Create the paste: Pour about a half-cup of baking soda into a bowl. Slowly drizzle in just enough white vinegar to form a thick, spreadable paste.
- Apply and wait: Slather the paste over the stained spots, paying extra attention to soap scum lines and hard water marks. Let it sit for about 15-20 minutes to work its magic.
- Scrub and rinse: Gently scrub the area with a non-abrasive sponge or a soft-bristled brush. Once you're done, rinse the tub thoroughly with warm water.
If you're looking for more ways to use simple ingredients for powerful results, check out these other awesome homemade cleaning product recipes.
Lemon and Salt for Brightening and Rust
Got some light rust stains or just a dull-looking tub? A simple lemon and salt combo is a surprisingly effective fix. The citric acid in lemon juice is brilliant at dissolving rust and brightening surfaces.
Salt provides a gentle scouring action to help lift the stains once they've been loosened by the acid. I've found this method works especially well on porcelain tubs.
Just slice a lemon in half, dip the cut side into a small dish of coarse salt, and start scrubbing the stain directly. Let the juice sit on the stain for about 10 minutes, then give it a good rinse.
Pro Tip: This natural approach is incredibly effective. Vinegar, another pantry staple, is also fantastic for dissolving mineral buildup. It's the same principle you'd use when learning how to clean shower heads with vinegar, as you're tackling the same types of deposits.
Hydrogen Peroxide for Tougher Stains
For stubborn organic stains like mildew that just won't budge, hydrogen peroxide gives you a bit more oomph without resorting to bleach. It's a natural whitening agent and disinfectant.
You can create a paste by mixing two parts baking soda with one part hydrogen peroxide. Apply it directly to the stain, let it sit for 30-45 minutes, and then come back to scrub gently and rinse it clean. This is the perfect next step when the simpler solutions don't quite cut it.
When to Use Commercial Stain Removers

While I love a good homemade cleaning solution, sometimes they just don't pack enough punch. When you're up against stains that have been setting in for weeks, or discoloration that laughs off your best DIY efforts, it’s probably time to bring in a commercial stain remover. These products are engineered to break down tough chemical bonds that simple pantry items can't touch.
Think about it this way: your trusty baking soda paste is a champ against fresh soap scum, but it’s not going to do much for rust that’s been embedding itself into your tub for months. This is exactly where specialized cleaners prove their worth. In fact, the global market for these products was valued at roughly USD 24.98 billion, and it's still growing. That tells you just how many of us rely on them for the really tough jobs. You can dig into more stats about the stain remover market and its growth on straitsresearch.com.
Matching the Cleaner to the Stain
The secret to winning the battle against stains is picking the right weapon. Staring at a whole aisle of cleaning products can feel overwhelming, but reading the label is your best strategy. Using the wrong cleaner won't just be ineffective—it could permanently damage your bathtub's finish.
Here's what to look for based on what you're trying to remove:
- Rust Stains: For those deep orange and brown streaks, you need a heavy hitter. Look for products with oxalic acid or hydrochloric acid. These are potent rust dissolvers, so be sure to handle them with care and keep the bathroom well-ventilated.
- Hard Water and Soap Scum: That cloudy, chalky film is caused by mineral deposits. Cleaners containing sulfamic acid or phosphoric acid are specifically designed to dissolve the calcium and magnesium buildup.
- Organic Stains (Mildew, Dyes): For stains from things like mold, mildew, or hair dye, enzymatic cleaners are fantastic. They use natural enzymes to break down organic material without harsh chemicals. Oxygenated bleach products (look for sodium percarbonate) are also a great, safer alternative to chlorine bleach for whitening.
Choosing the Right Product for Your Bathtub Material
Just as critical as matching the cleaner to the stain is matching it to your tub's material. A gritty powder cleanser that works wonders on an old cast iron tub could leave a spiderweb of scratches on a modern acrylic one. Always, always check the product label for warnings about specific surfaces.
Crucial Tip: Never, ever use abrasive powders or scouring pads on acrylic or fiberglass tubs. They create tiny micro-scratches that will dull the finish and, ironically, trap even more dirt, making stains even harder to remove in the future.
Here’s a quick guide for pairing cleaners with common tub types:
- Porcelain and Enameled Cast Iron: These surfaces are incredibly durable. They can usually handle acidic cleaners and gentle powdered cleansers without any issues.
- Acrylic and Fiberglass: These materials are much more delicate. Stick to non-abrasive sprays, gels, or liquid cleaners. It's always a smart move to test any new product on a small, hidden spot first to make sure it doesn’t cause any damage or discoloration.
Taking a minute to read the label and understand what you’re buying can make all the difference. It ensures you get rid of those stubborn bathtub stains safely and effectively, without creating a bigger problem.
The Best Way to Deep Clean Your Bathtub
Alright, you’ve figured out what kind of stain you’re dealing with and picked your weapon of choice. Now it's time to get down to business. A real deep clean isn't about scrubbing until your arms ache; it’s a smart process that gets rid of those stubborn stains for good without wrecking your tub's surface.
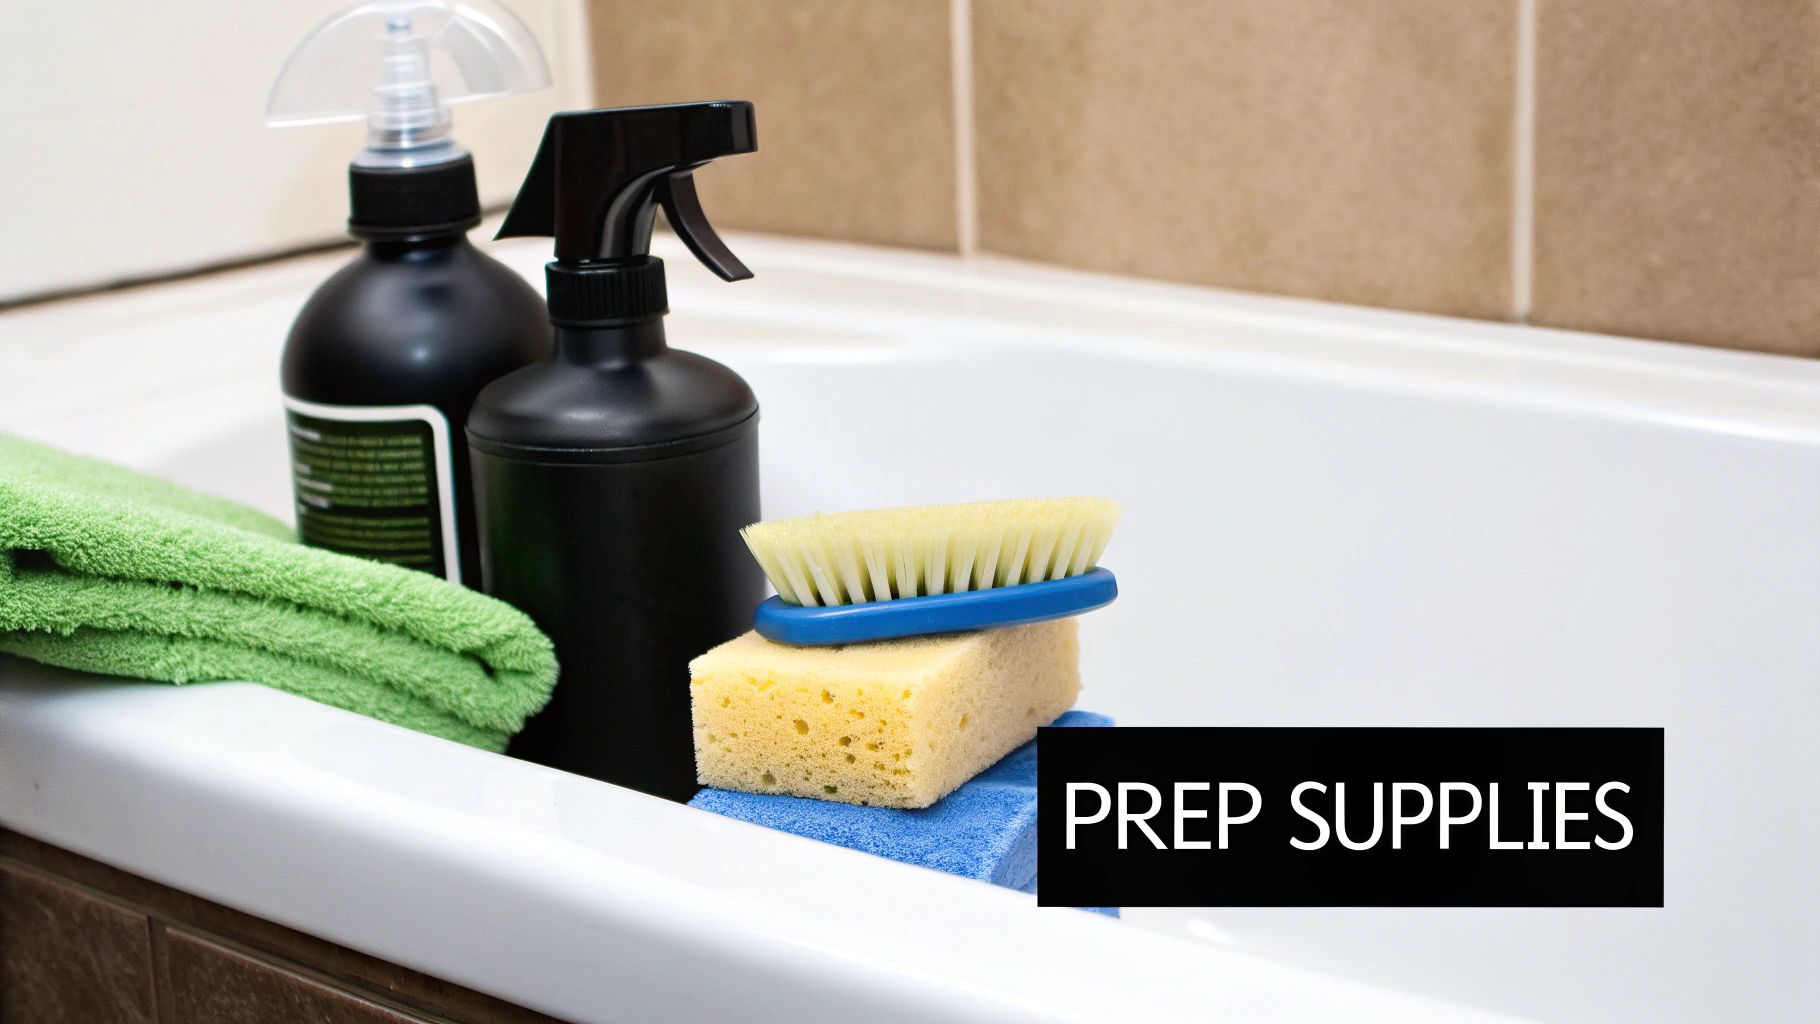
First things first, and this is a step people often skip: prep the area. Get all the shampoo bottles, soap dishes, razors, and bath toys out of the tub and off the ledges. You need a completely clear surface to work with. Once that's done, give the tub a quick rinse with warm water to wash away any loose hair or grime.
Finally, and this is non-negotiable, get some air moving. Crack open a window or flip on the bathroom exhaust fan. Even if you're using something natural like vinegar, the fumes can get surprisingly strong in a small, enclosed bathroom. Safety first.
Applying and Activating Your Cleaner
Whether you’ve mixed up a DIY paste or you're using a commercial spray, how you apply it makes all the difference. For homemade pastes (like a simple baking soda and water mix), use a spatula or your gloved hands to smear a thick, even layer over the stained spots. If you're using a liquid or spray, make sure you saturate the entire surface, getting the walls and the floor of the tub.
Now for the most important part: patience. You have to give the cleaner time to do its job. Rushing this is the number one reason cleaning attempts fail. Let that solution sit for at least 15-20 minutes. For really tough, set-in stains, you might even need to let it sit for up to an hour. This "dwell time" lets the active ingredients get in there and break down the stain's chemical bonds, which does most of the hard work for you.
Key Insight: Think of it like marinating meat. The cleaner is tenderizing the stain, making it way easier to remove later. If you start scrubbing immediately, you're just fighting the stain at full strength, which means more work for a worse result.
This simple visual breaks down the core process into three key actions.
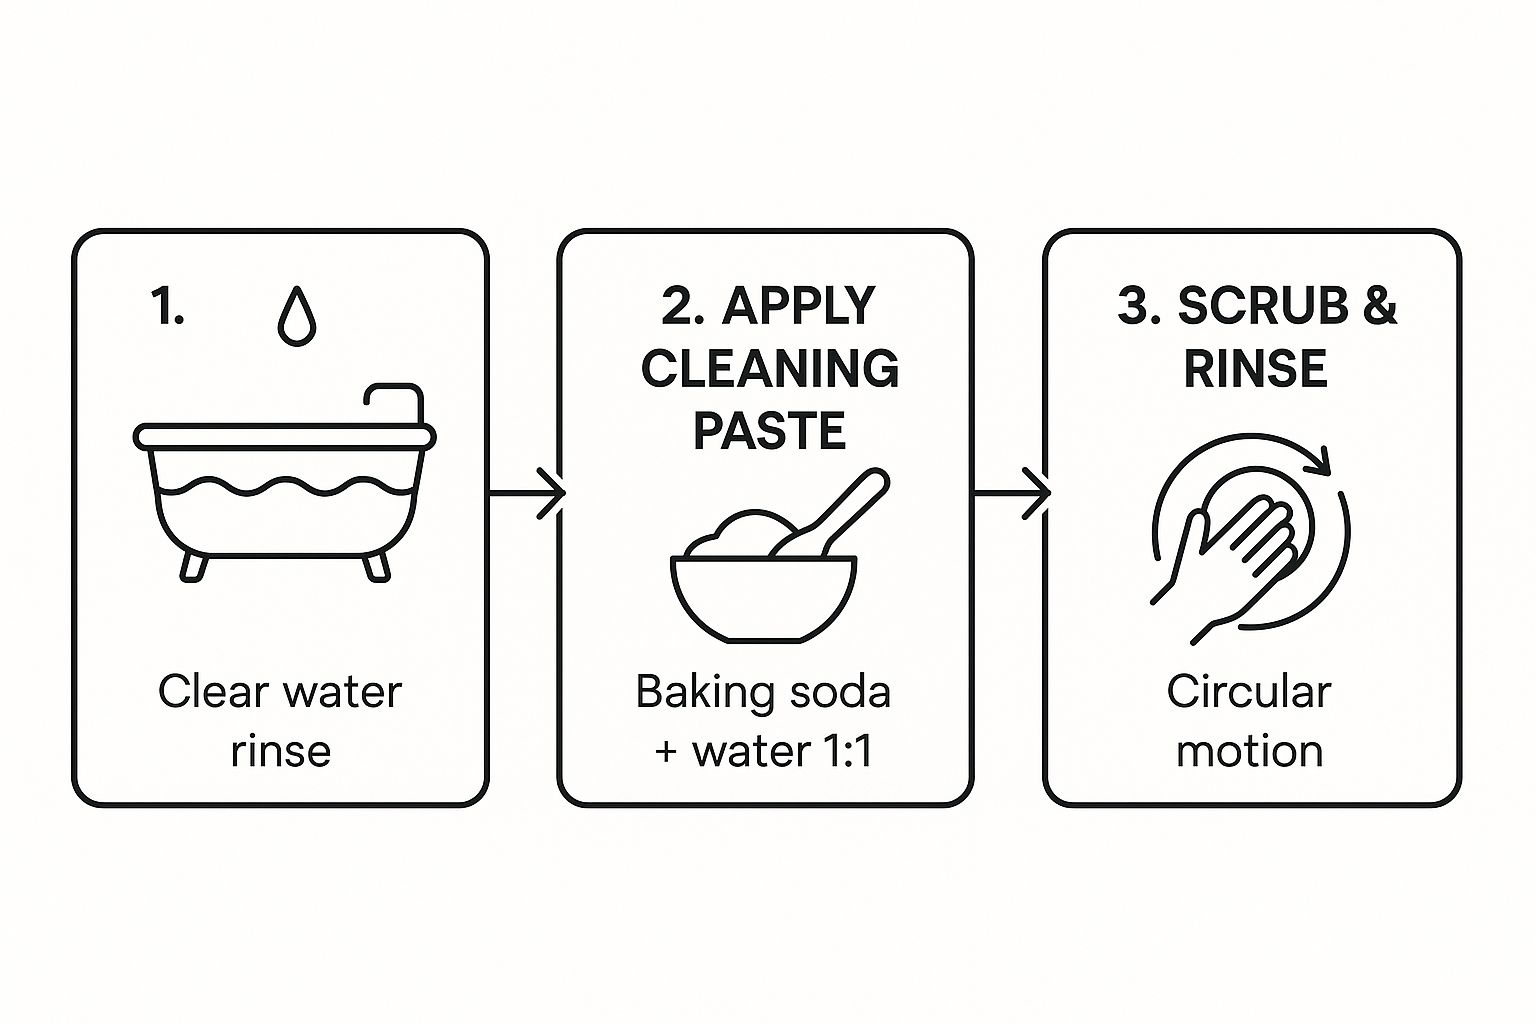
As you can see, success is all about following the right sequence—rinse, apply, and then scrub. It’s about working smarter, not harder.
The Final Scrub and Rinse
Once your cleaner has had enough time to work its magic, it's time to scrub. Always grab a non-abrasive sponge or a soft-bristle brush for this. Stay away from steel wool or those aggressive green scouring pads, as they’ll create tiny scratches all over most bathtub surfaces. Those scratches just become magnets for future dirt and stains.
Work in small, circular motions with firm but gentle pressure. You should feel the grime and stains lifting away pretty easily. If you have to put all your muscle into it, the cleaner probably needed more dwell time. Pay special attention to the curve where the tub floor meets the walls, and get in there around the drain and faucet—that’s where buildup is usually the worst.
After you’ve scrubbed the whole tub, give it a thorough rinse with warm water. You want to make sure you get all the cleaning residue off, since leftover cleaner can actually attract new dirt. For that final, sparkling finish, take a clean microfiber cloth and dry the entire tub. This last step gets rid of any mineral spots left by the water and leaves the surface gleaming.
How to Keep Bathtub Stains from Coming Back
Getting those stubborn stains out of your tub feels like a major win, but the real victory is making sure they never come back. The secret? Shifting from a reactive cleaning frenzy to proactive, everyday maintenance. Trust me, a few simple, consistent habits are far more powerful than a marathon scrubbing session every few months.
The goal is to cut stains off at the source before they even think about settling in. By tweaking your routine just a little, you can break that frustrating clean-stain-repeat cycle and keep your tub looking brand new with way less effort.
Adopt Simple Daily Habits
Consistency is your single most powerful weapon against stains. You don’t need to block off hours on your calendar; just a minute or two after each shower can make an incredible difference.
These quick actions prevent the buildup of soap scum and mineral deposits—the very things that turn into those ugly, hard-to-remove stains.
- Rinse After Every Use: Once you're done bathing, give the tub a quick rinse with warm water. This simple step washes away fresh soap residue and body oils before they can dry and cling to the surface.
- Wipe It Down: Keep a squeegee or a microfiber cloth in your shower. After rinsing, a quick wipe-down of the tub walls and floor leaves surfaces dry, which means mildew and hard water spots can't form.
- Use a Daily Shower Spray: A few spritzes of a daily shower cleaner after the last use of the day helps dissolve soap scum and prevent mineral buildup. This dramatically cuts down on how often you'll need to do a deep clean.
A Proactive Approach: Think of it like brushing your teeth. You do it every day to prevent cavities, not wait for a toothache to see the dentist. The same logic keeps your bathtub sparkling clean.
Address the Root of the Problem
While daily habits are a game-changer, sometimes you have to dig a little deeper and fix the underlying issues causing the stains. If you find yourself constantly battling the same type of stain, that’s your tub telling you there’s a bigger problem at play.
Fixing these core issues is the only true long-term solution, and it will save you countless hours of future scrubbing. It's a small investment that pays off with a bathroom that stays cleaner, longer. The demand for these solutions is huge; the global bathroom cleaners market was worth around USD 5.8 billion in 2023, with North America leading the way. You can see the full breakdown in this bathroom cleaners market report.
Long-Term Prevention Strategies
For those really persistent stains, it’s time to look beyond just cleaning the surface. Making a few strategic upgrades or repairs can eliminate the source of your frustration once and for all.
- Fix Leaky Faucets: That constant drip, drip, drip isn't just annoying—it's the number one cause of rust stains. Repairing a leaky faucet stops the steady stream of iron-rich water that creates those ugly orange-brown streaks.
- Install a Water Softener: If you live in an area with hard water, you're fighting a losing battle against mineral deposits. A whole-house water softener removes the stain-causing calcium and magnesium from your water supply, preventing hard water stains everywhere in your home, not just the tub. For more ideas, check out our guide on removing hard water stains.
- Switch Your Soap: Certain bar soaps are packed with talc, a major ingredient in soap scum. Simply switching to a liquid body wash or a glycerin-based soap can significantly reduce the filmy residue left behind after you bathe.
Frequently Asked Questions About Bathtub Stains
Even with the best cleaning game plan, some tricky situations can pop up. Let's tackle some of the most common questions people have when they're figuring out how to get rid of stains in a bathtub so you can handle anything that comes your way.
Can I Use Bleach to Clean My Bathtub?
It's so tempting to grab the bleach bottle, thinking it's the ultimate stain destroyer, but for bathtubs, it’s usually the wrong tool for the job. While bleach is fantastic for disinfecting, it doesn't do much against the mineral-based bonds you find in hard water or rust stains.
In fact, hitting a rust stain with bleach can make things worse. It oxidizes the iron, basically locking the stain in permanently. For materials like acrylic, bleach is way too harsh and can cause a yellowing effect over time that you can’t undo. It's much smarter to stick with cleaners made for the specific stain, like vinegar for hard water or a product with oxalic acid for rust.
Why Do Stains Keep Coming Back in the Same Spot?
If you feel like you're stuck cleaning the same spot over and over, don't blame your scrubbing skills—it’s the source of the stain. Recurring stains are almost always a sign of an underlying problem that hasn't been fixed yet.
- A persistent rust stain is a huge red flag for a slow-dripping faucet or a small leak somewhere in your plumbing fixtures.
- Soap scum that loves building up in one particular area might mean your tub isn’t draining correctly, letting soapy water pool there.
The only way to permanently get rid of a recurring stain is to fix what's causing it. No amount of cleaning will stop a rust stain if the faucet keeps dripping. Find and repair the source, and you'll finally break the cycle.
What's the Best Way to Clean a Textured, Non-Slip Tub Bottom?
Those non-slip surfaces are a lifesaver for safety, but they are notorious for trapping dirt and grime in all those tiny grooves. A regular sponge just skims over the top, leaving the really embedded gunk behind.
The best approach here is to use a cleaning paste, like the baking soda and water mix we talked about. Slather it on and let it sit for about 15 minutes to really break down the grime. Then, grab a medium-bristle brush instead of a sponge. The bristles are perfect for getting down into that texture and lifting all the dirt out. Just make sure to avoid anything too abrasive, like steel wool, which can damage the non-slip coating.
Feeling overwhelmed by stubborn stains and a never-ending cleaning list? Let the professionals at Custom Maids give you back your time and a sparkling clean home. We’ve been Mid-Michigan’s trusted choice for over 40 years. Schedule your free consultation today!